Sunday, June 22, 2014

Simple Whatnots... Kim Diehl... Mini Quilts... Fantastic Price!!

Have you heard about Kim Diehl's 
Simple Whatnots Club?

6 Beautiful new Mini-Quilt patterns
A new line of Kim Diehl fabric
for Henry Glass
"Vintage Farmhouse"

Only available at your favorite quilt shops...

 ***

Well one of my favorite local quilt shops is having a fantastic deal on the
Simple Whatnots Club:

16 Yards of Fabric
 -- enough to finish all 6 mini-quilts including backing and binding

6 brand new Kim Diehl
Simple Whatnot patterns
 -- including an applique and pieced version of the Hopscotch Mini Quilt

Here is the Applique Version of Hopscotch -- isn't is beautiful?
Image Courtesy Kim Dieh's Facebook Page
 Here is Idaho Lily
Another one of my favorites!!
Image Courtesy Kim Diehl's Facebook page
AND

A Vintage Farmhouse Panel
thrown in for fun!!
Image Courtesy Henry Glass

All of this for only $160 (plus s/h) at
Sew It Is.
 Where else can you get 16 yards of
newly released fabric,
Plus 6 brand new Kim Diehl
Simple Whatnot patterns,
and
A Vintage Farmhouse panel
for this price?

That is only $10.00 per yard of fabric and the patterns and panel are FREE!!
WOW !

I'm Sew excited - 
I ordered my kit tonight!!

Click here to go to the item at Sew It Is

 If you're a Kim Diehl lover like I am, it's hard to pass up.
Thanks Cindy -- for the fantastic deal!!

Happy Monday everyone...
Karen

Wednesday, June 18, 2014

Building Houses - With Needle and Thread

Last week we met for the monthly "Quilting the Garden" applique along hosted by our sweet friend Debbie Wick, and with two other special ladies -- my sister Janet and friend Bonnie.

We meet monthly to drool over Debbie's completed Quilting the Garden Quilt (a design and book by Blackbird Designs) and plan out the fabric and stitching for our own blocks. 

Our versions of Quilting the Garden are being completed with various methods of Needle Turn Applique.    Bonnie uses a back basting method, Janet uses freezer paper templates attached while stitching, and I use a freezer paper marking method. 

If you're interested in learning my method of Needle Turn Applique check out "Teardrops of Love - a needle turn applique tutorial" on my blog by clicking here.
Back to Quilting the Garden -- Janet, Bonnie and I have nearly completed our house blocks so I wanted to share them.

First is Debbie's House block from her completed quilt.  Isn't it beautiful?  Debbie always adorns her blocks with the sweetest embroidery.  Check out the flower box flowers and the sign on the door -- sweet! 

Debbie's quilt recently won 2nd place in the Large Bed Quilts Category at the Sauder Village Quilt Show in Archbold, OH!  Congratulations Debbie!!
Debbie's Completed House Block
Next up is my block -- it's almost done.  I need to finish up the upper flower box and the special window on the front door.   That beautiful pin-stripe background was gifted to me from Debbie - it was her last piece of fabric of this type - really pretty!  Thank you Debbie...
Karen's House Block
Next up is Janet's House Block -- I just LOVE the pink flowers and the paisley eaves on the roof!  Janet has yet to finish up her flower boxes and embroidery but the block is beautiful!  I love how the blue door and blue leaves draw out the blue paisley....
Janet's House Block
Finally there is Bonnie's House Block - I love the background fabric on Bonnie's block - isn't it beautiful?  Combine it with the delicate pinks and blues she used and it all comes together perfectly!!  It's just really pretty isn't it ?
Bonnie's House Block
Check out the embroidery on Bonnie's flower boxes -- SWEET!!   We won't mention who stitched these flowers boxes but I can say it wasn't me (or Bonnie or Janet)!!
If you're interested, you can see the house block being constructed (with some tutorials and other block progress) by clicking here and here.
*
Have a wonderful day and thanks for stopping by!

Hugs,
Karen
PS - Linking up to some great WIP/Fabric linky parties -- check them out on my sidebar to see tons of beautiful and inspirational work!

Wednesday, June 11, 2014

Sharing WIP Like a Proud Momma

Oh I'm having such fun!!   I still have to pinch myself to be sure I'm not dreaming.... In the last few weeks I started teaching Introductory Wool Applique "Spring Basket" with two different groups and I'm doing cartwheels in celebration!!

Spring Basket Sample by Karen L. Miller ~ Redbird Quilt Co.
Many thanks to the ladies at the New Quilters On the Block Guild in Candor, NY and to the Partners and Students at Quilters Corner in Ithaca, NY for taking a chance on this green instructor!   Thank you ladies -- ya'll are just wonderful to work with...  
New Quilters on the Block - Working Hard

The New Quilters on the Block wanted to learn the basics of wool applique -- knowing that we wouldn't finish any pieces in the 4 hours we spent together.  We reviewed wool preparation, floss basics, Needles: threading - knotting - burying - finishing;  Stitches: blanket, couch, overhand, french knot, and so on...  They did a fantastic job on their quilts -- and Joan came sharing her own overdyed wools with the entire group of 11 ladies (and one lucky instructor)!   We had a fun time!
New Quilters On the Block -- Almost quitting time...

Besides the people, personalities, and comradely -- here are some moments that make this sew much fun....


1.  The "Light Bulb" moment - You're looking in a persons eye -- they're watching the lesson, and listening to what you share, and they sit down and take fabric, needle and thread in hand and "click" -- it works!!  They get it!  WOW - now that is fun!

2. "Individuality & Creativity" -- this is really, really fun for me.  The class comes in with their wools and backgrounds and nobody is exactly sure where they're going.   After 3-6 hours it all starts coming together and everyone is drooling over everyone else's projects.    Oh my that is fun!

Here are some Work in Progress images from Session 2 at Quilters Corner:

My apologies to Ruth -- somehow I managed to get out the door without taking a picture of her quilt -- I promise I'll share in another post.

This is Barbara's Spring Basket - she is stitching it onto black wool -- so soft and plush.  Don't you just LOVE that basket and how she cut it on point... the piece is coming together beautifully - I love how she used different color berries for her hyacinth. 
Barbara's WIP
This is Cathy's WIP -- Cathy took a whole different approach with a Gray wool background and a complimentary gray wool basket -- She used buttons for the centers of her mums -- how sweet!  And how about that bird ?  Don't you just love the red breast?   It's fabulous!
Cathy's WIP
Here is Mary Ann's WIP -- Mary Ann had fun with colors that were closer to the original pattern sample and it worked out wonderfully.  Her forsythia are bright and cheery, and the entire piece just jives... I love it!
Mary Ann's Work in Progress
No matter if you're the teacher or the student -- it's just fun to share quilting moments.  If you're a quilter you LOVE to see other people's work....

Here is "the other" Cathy's Spring Basket -- she nearly finished it in our 2nd 3 hour session.  The background is cotton fabric but it comes off plush and full -- and almost looking like green grass.  Cathy went with brights and WOW -- what a fantastic finish.  Congratulations Cathy!
The other Cathy's Spring Basket -- All done except for the quilting
After class Mary Ann worked hard and finished her piece over the weekend.  Here is an image she sent me -- didn't it come out beautifully ?  Way to go Mary Ann !! 
If you live locally and would like to take Introduction to Wool Applique ~ Spring Basket, I'll be teaching it in a 1 day Workshop at Penn Yan Sewing Machines on Tuesday, August 19th from 9am to 3pm.   You can reach the shop by calling 607-243-7879.   

I'll be updating my Facebook Events Page with a complete lineup of classes this week.

If you're not local, a PDF version of Spring Basket is available for immediate purchase and download at my Crafty Pattern Store.

Thanks for stopping by today and sharing in my excitement!!

Hugs,
Karen

Wednesday, June 4, 2014

Do you FMQ? The Process...

It's been many, many weeks since I've had my hand at moving fabric around under a needle - I needed the practice, I needed the down time, I just needed to do it!  

This is a sweet little Piggy Growth Chart by The Wonderful World of Susybee and it's a fun way to get those FMQ juices flowing again.   I dove into my stash of beautiful #Aurifil Mako Cotton 50Wt threads and had some fun!!
Here are the steps that worked for me:

1.  Give your machine a good cleaning inside and out.  The Janome Horizon doesn't need to be oiled, so a good dusting did the trick.  I removed the face plate, swept all around, and discarded those dust bunnies!  It's extremely important to start with a clean machine.

2.  Outfit the machine with a Little Genie Magic Bobbin washer -- (see it below in the bobbin area ?)  These little guys are the best.  They take up that little extra space in your bobbin area and help your bobbin thread glide smoothly - especially during Free Motion Quilting zigs and zags.  One washer lasts years so they are well worth the investment (12 per package).  I've never done without one and purchased them originally on recommendation from Leah Day.   Give them a try!  Share with your friends!

3. Start with a full-up bobbin loaded with Aurifil Mako Cotton 50Wt thread.  YOU KNOW I love this thread! The 50Wt thread is thin and goes a long way to make your bobbin last and last...  I use the same thread in the top and bobbin and it works out wonderfully.  
4.  Thread, thread, thread -- was fun to open and use a brand new, full spool of Aurifil thread on the machine.  This is Mako Cotton 50 Wt in Color #2423.  Just right for the piggy and the border...
5. Feed Dogs -- to Drop or Not to Drop:
Oh NO!  Now all my secrets are out... this is a sweet little workaround to avoid dropping the feed dogs and setting the thread length to zero.

On the Horizon I find that the machine makes more consistent stitches when I leave the feed dogs UP and the thread length at 2.5.    (Yet another tip from the wonderfully skilled Leah Day).

I tape this little helper down so that my feed dogs don't damage the underside of the Supreme Slider...  PS - I do NOT engage my single hole throat plate on the Horizon as I have a small burr on the underside and it snags and breaks my thread -- I really should have that checked out ;)

NOTE:  I've replace my cardboard feed dog cover with one made from template plastic.  The template plastic holds up better to the feed dog movement and puts less "dust" into the casing area.
6. Insert a new needle --  This time I was running with a  Microtex 80/12 needle.  The Microtex Sharps are fantastic too! Aurifil recommends you use Microtex 80/12 with 50Wt thread - (I didn't realize that).  You can see their recommendations for Mako Cotton 50Wt by clicking here.

Note: My Janome Horizon 7700 REALLY likes it when I use Janome brand needles.  Superior Brand Sewing Needles are awesome too!.  If you're skipping stitches chances are your needle need to be changed and/or "right sized" or your foot needs to rest closer to the fabric.

7. Supreme Slider & Gloves:  I washed the linty back-side of my Queen Supreme Slider (so it will stick well) and gathered my Machiners X-small gloves.  The slider is a Teflon like sheet that allows your quilt to move smoothly over the machine bed.  There are other less expensive models available as well but I've not yet tried them.   The Gloves are prefect to Grip your quilt layers while manipulating for quilting.  The Machingers gloves run large -- so the X-small was well large enough for my hands.

8. Quilting Foot:  Choose and attach your favorite FMQ foot. I normally work with my open foot --if I could only find it (Where did it go ??)

Note: When I quilt around applique I almost always use a CLOSED foot.  The Open Toe Feet may catch on wool or needle turn applique pieces, especially if you're using a higher loft batting. Personally I also prefer to use a foot that is ROUND.  Some feet are square or oblong and personally I find this distracting, especially when I am echo quilting.

9. Needle down position:  Before you start stitching -- engage the "needle down" option if your machine has it.  This way, whenever you stop sewing your needle will stop in the "Down" position.   This allows you to reposition your hands without the quilt top moving.
10.  Top thread tension:   Last but not least, up the top thread tension -- this is a MUST DO for me on the Janome with Cotton fabric, Aurifil Thread, and one or two layers of batting (cotton/wool).  Works like a charm every time.  

Note: Each machine and quilting style will vary.
Woohoo!  We're ready to stitch !!

Note:  This quilt was prepared with one layer of warm and natural batting.  An additional layer of Wool or Silk batting would give much more texture to the quilting.

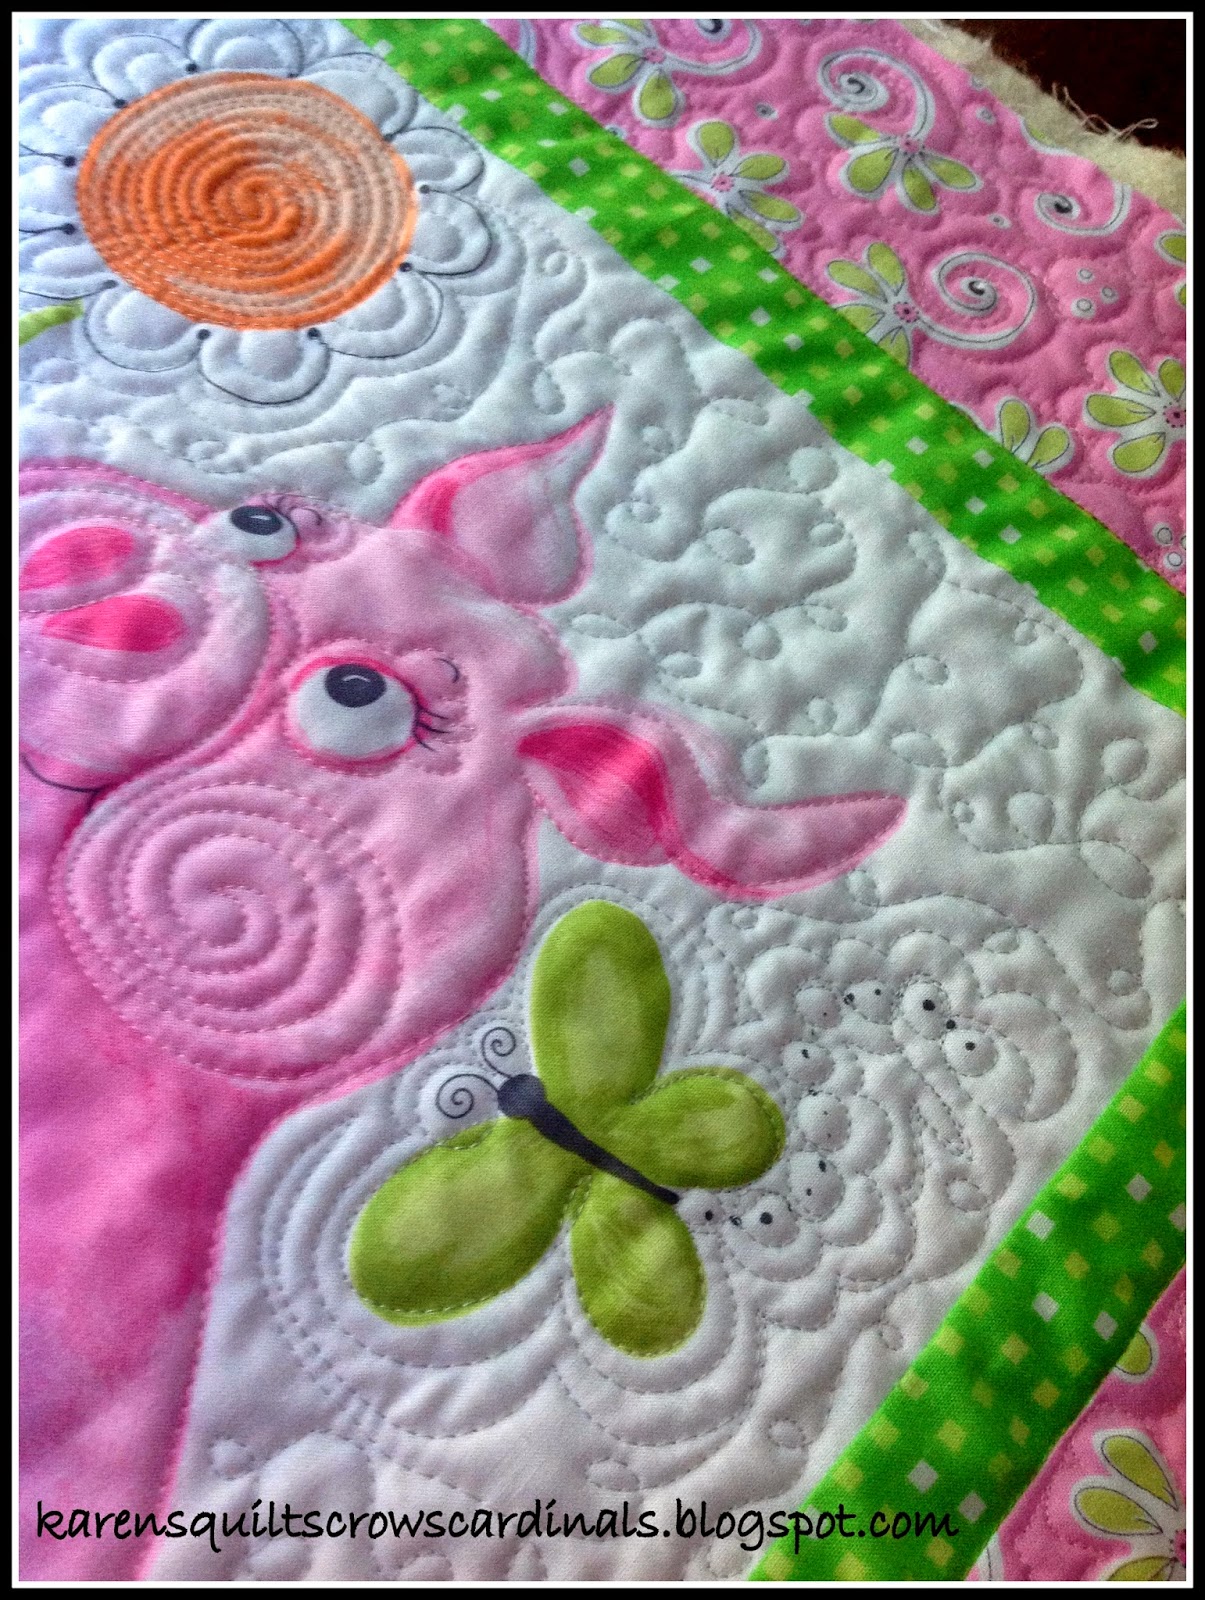
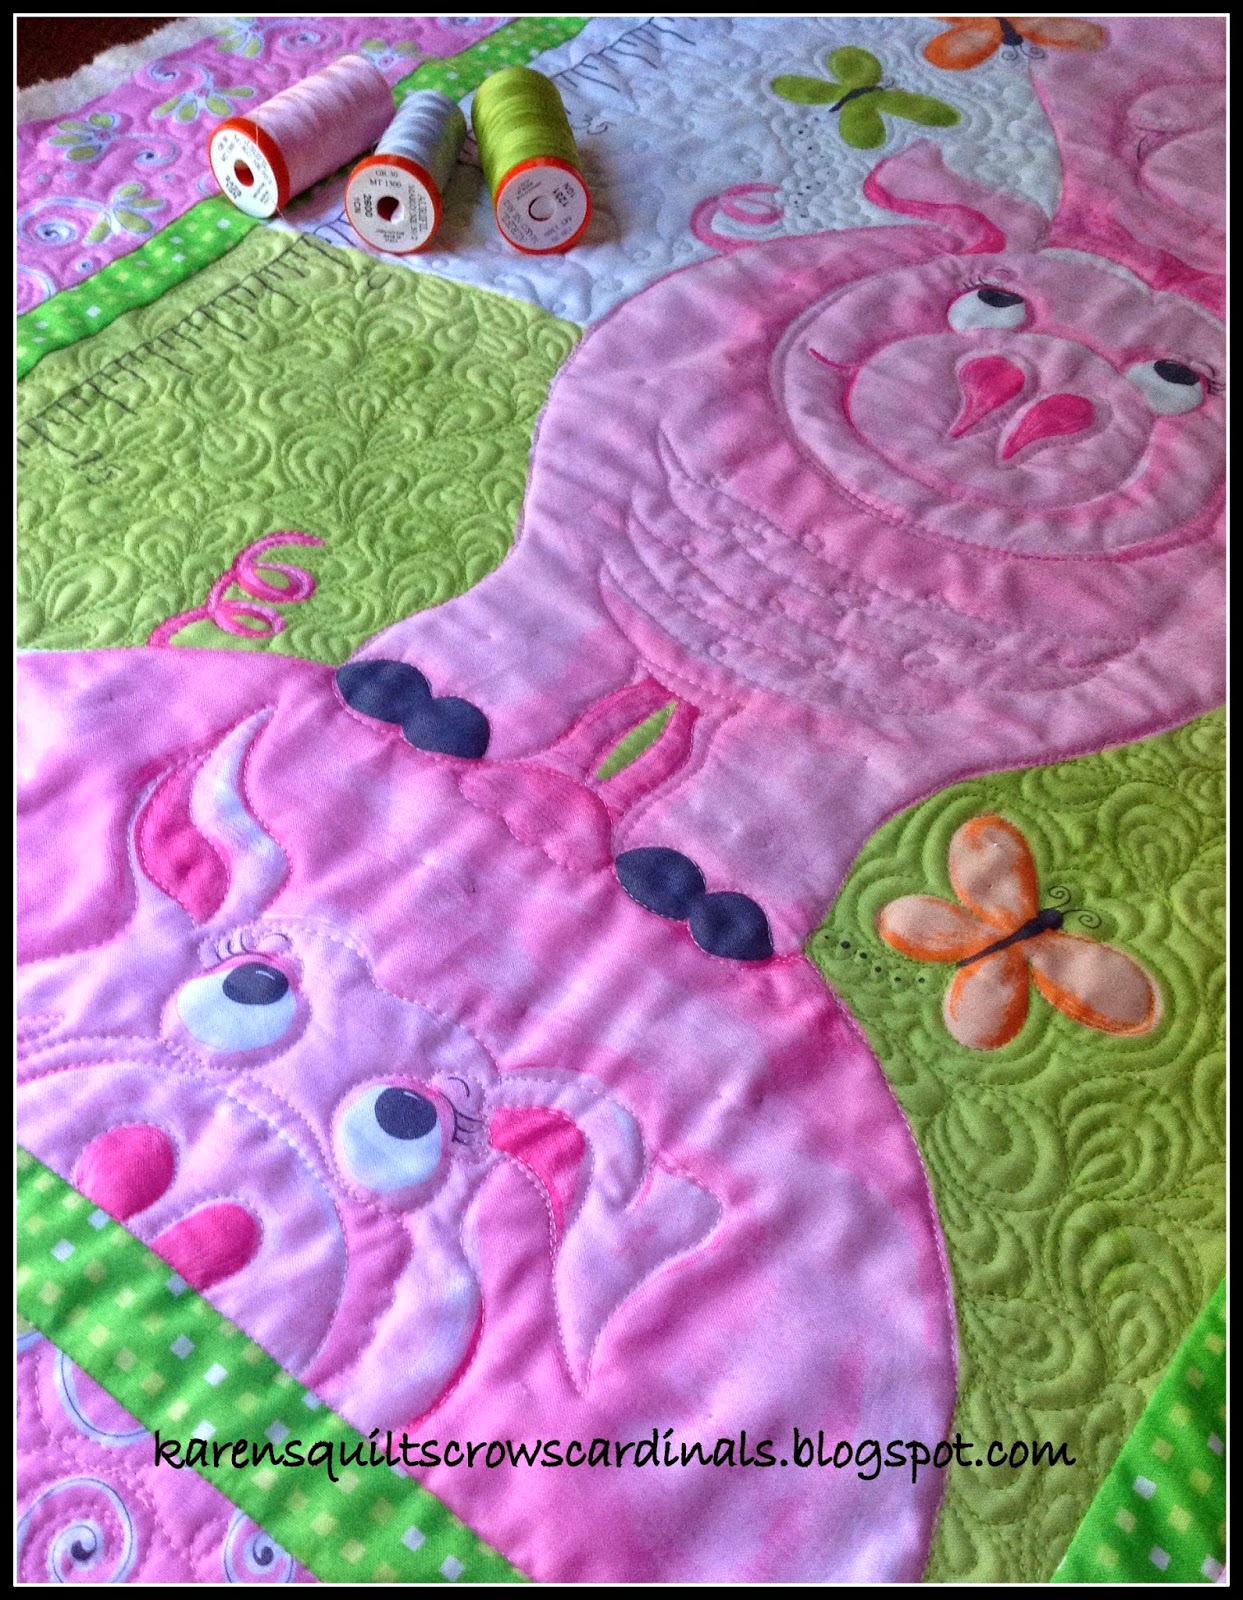
First I wanted to outline all the pigs, then follow their inside features as well, eyes, noses, etc.

On this sweet little growth chart my customer sister told me not to fuss... so I took a few shortcuts.

To start, bring the bobbin thread to the top, take a couple stitches in place and trim threads (do not do this on a show or juried quilt).
Proceed around the piggy , highlighting the piggy features as best you can. 
This top piggy was fun to stitch -- the rounded features of his face and belly screamed spiral!!  I was a little wonky starting out but he's still sweet!!
After outlining the piggies and filling in their features, decide on a background filler (and color).

Use the filler to travel from background component to background component.

I chose to use a quick "loop de loop" and it worked out great.

The Aurifil Mako Cotton 50Wt in Color 2600 gave the background a bit of sparkle...  Sweet!
While traveling with the background loop de loop I would find myself inching up on a background component (butterfly, bee, etc).

When close enough stitch in the ditch around the item -- then make a few echo stitches to complete the shape.  I love the way stitching the pebbles gives the butterfly movement...
The flower component was fun to quilt!  Start on the perimeter and work your way to the middle with a swirl -- then split the width of the quilting on your way back out.  Be sure to outline the inside and outside of the petals - and echo stitching always makes things look more defined.
The green background spoke of leaves and grass to me -- so I decided to incorporate an Angela Walters design -- I love the way it turned out.
Oh, and that Aurifil Mako Cotton 50 Wt in Color #1231 matched the greenery perfectly!!

I had a tough time deciding what to stitch in the outer border -- so again I let the fabric talk to me and did an outline stitch around the flowers and swirls and pebbles... I think it came out just fine.  Do you like it ?
Here is the status as I head to bed -- I think I need to do something with the green border but my customer sister is telling me not to fuss.  
We'll see what tomorrow brings ;)

You can see other Susybee Growth charts I've quilted here, here and here.

***
There are more Free Tutorials and Patterns on my blog - just click here -- or visit the My Tutorials tab at the top of this page (or, on a mobile device drop down the line options).

I also share Free Motion Quilting on a Domestic machine on my YouTube Channel -- Click here!

I would love to hear your feedback - Thanks for stopping by!

*****

For a more in depth Free Motion Quilting tutorial -- please visit the "Free Motion Quilting Fun" post where I share insight to different weight threads and quilting motif.  This main tutorial is hosted by the Bear Creek Quilting Company but you can click here for my introductory post. 

*****

Linking up to a few of my favorite parties -- check them out on the sidebar and click on over to view the eye candy.

Hugs,
Karen